Chevrolet Silverado 1999-2006: How to Change Oil
Changing the engine oil in your Silverado is an importance maintenance service, which is recommended at least every 3,000 miles. It's a simple DIY job, and this how-to will show you how it is done.
This article applies to the Chevrolet Silverado GMT800 (1999-2006).
One of the first things any prospective gear head learns is how to change a vehicle's engine oil. This job is one of the easiest, yet most important maintenance tasks on any car or truck, and virtually anyone can get it done with just a few tools along with a little elbow grease. Engine oil circulates through your truck's engine, keeping its grinding gears as well as other moving components well-lubricated and cooled down. Over time, oil loses its ability to absorb heat and it picks up particles from normal engine wear, meaning that an oil change is more than necessary. Keep reading as this article will show you how to change your Silverado's engine oil.

Materials Needed
- Drain pan
- Funnel
- Oil filter wrench
- Adjustable wrench
- Jack and jack stands (optional)
- Paper towels for clean up
Step 1 – Locate the oil filler neck and cap
Pop your truck's hood and unscrew the oil filler cap. It is located on the passenger's side of the engine. The purpose of removing the cap is to relieve pressure when draining the oil, allowing it to flow out freely. Jacking up your truck is optional and does give you more space to work with, but remember to always support your truck with jack stands when working under the vehicle.

Warning
Allow the engine to cool down prior to draining the oil. The engine oil and the exhaust pipes surrounding the oil pan may be extremely hot.
(Related Article: How to Jack Up Your Truck - ChevroletForum.com)
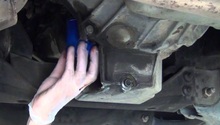
Step 2 – Drain the oil and remove the oil filter
The oil pan is located directly underneath the engine, and the drain plug/bolt is located on the back of the oil pan facing the rear of the truck. Place a drain pan underneath the drain plug, and loosen the plug using an adjustable wrench. Then quickly remove the drain plug with your hand, and let the oil drain into the pan. Once the oil stops draining, re-install and fasten the drain plug to a snug fit.
The oil filter is located between the oil pan and the prop shaft. Use an oil filter wrench to rotate the filter counterclockwise, and then remove it. Make sure the oil pan is underneath the oil filter because excess oil will spill out from the filter and the oil filter hole.

Step 3 – Replace the filter and pour in new engine oil
Rub a small amount of fresh oil around the rubber seal of the oil filter before installing it. Once the oil has completely drained, thread in the new oil filter by hand. Use the oil filter wrench to tighten the oil filter to a snug fit.
Insert a funnel into the oil filler neck, and slowly pour in new engine oil. The amount of engine oil is different for all engine types, so refer to your truck's owner's manual for the correct amount. Reattach the oil filler cap and start the engine. Let it idle to operating temperatures, and then turn it off. Check the oil dipstick to make sure the engine oil is at the correct level. Top off the oil as needed, and double check the oil filter as well as drain plug for any leaks.

Featured Video: Chevrolet Silverado 1500 Oil Change
Related Discussion
- Change Oil Every 5,000 Miles? - ChevroletForum.com