Chevrolet Silverado 2014-Present: How to Replace Air Filter
A new air filter will help your truck breath easier and make more power. You will never pay anyone else to do it for you again. So continue reading to learn how to do this this simple maintenance in your Chevrolet Silverado.
This article applies to the Chevrolet Silverado gasoline engines (2014-Present).
The engine air filter keeps the fresh air coming into your engine clean. Over time, an air filter gets dirty and needs to be changed for peak efficiency. If your truck is used in severe duty environments, it will need to be changed more frequently than normal. It is a good idea to check it every time you change the oil. You can take the filter out, hold it up to the sunlight to look through it, and get an idea of how dirty it is. Even though you may be able to see light through the filter, it does not necessarily mean it is still good. GM says to change it at 45,000 miles, but you might want to change it every 30,000 miles or three years. Severe duty would be more like 10,000 miles or yearly. Many Silverados have a filter minder that is supposed to show you when to replace the air filter, but don't rely on the filter minder and just change it when it makes sense to you. A clean new air filter is cheap insurance to protect your engine.

Materials Needed
- T25 Torx bit
- Ratchet, extension, swivel, and socket to fit the bit
- Rags
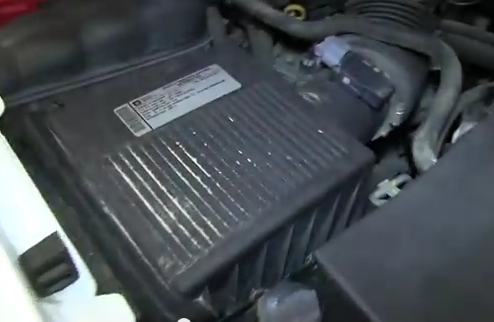
Step 1 – Locate the air cleaner assembly
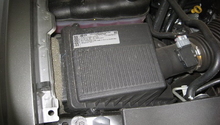
The air filter is located inside the air cleaner assembly. If you stand in front of your truck, the air cleaner assembly is on the left side in the front of the engine compartment. Your assembly will look very similar to the one in Figure 1. The radiator is in front of the air cleaner assembly.
Step 2 – Remove lid from air filter assembly
Using your T25 Torx bit, remove the four screws at each corner of the air cleaner assembly. The top will be ready to remove now.

Pro Tip
Set the Torx screws aside in a safe place because you will need them for reassembly.
Step 3 – Remove old air filter and replace
Once the four screws are removed, lift the top of the air cleaner assembly up as shown in Figure 3. The air filter will be in the bottom of the assembly. Just lift it up and out of the assembly. Then, press the new air filter in the bottom of the assembly (Figure 4). It will fit flush and flat, so the lid goes back on easily and you won't need to force it.
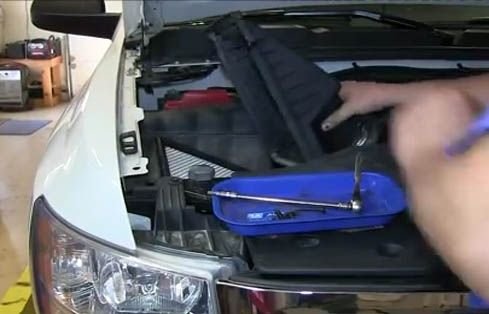
Figure 3. Lift top of air cleaner assembly up. 
Figure 4. Press new filter in place.
Pro Tip
Wipe the inside of the air cleaner assembly clean, so no dirt or debris is present.
Step 4 – Re-install
Re-install all four of the Torx screws that were removed in Step 2. The top of the assembly should seal tight and evenly. Throw away the old air filter, and you are done! You just saved yourself some money, and have a more efficient engine.
Pro Tip
A K&N air filter is reusable. Also, it is proven to increase engine power and fuel mileage in the company's testing. You can clean it every time you change your oil. While an ordinary filter may be $15, a K&N will be more in the $60 range. Although, it will last for the life of your truck.
Featured Video: How to Replace Engine Air Filter
Related Discussions
- Air Filter Replacement - ChevroletForum.com
- K&N Air Filter and Gas Mileage - ChevroletForum.com
- Silverado Air Filter Replacement - ChevroletForum.com